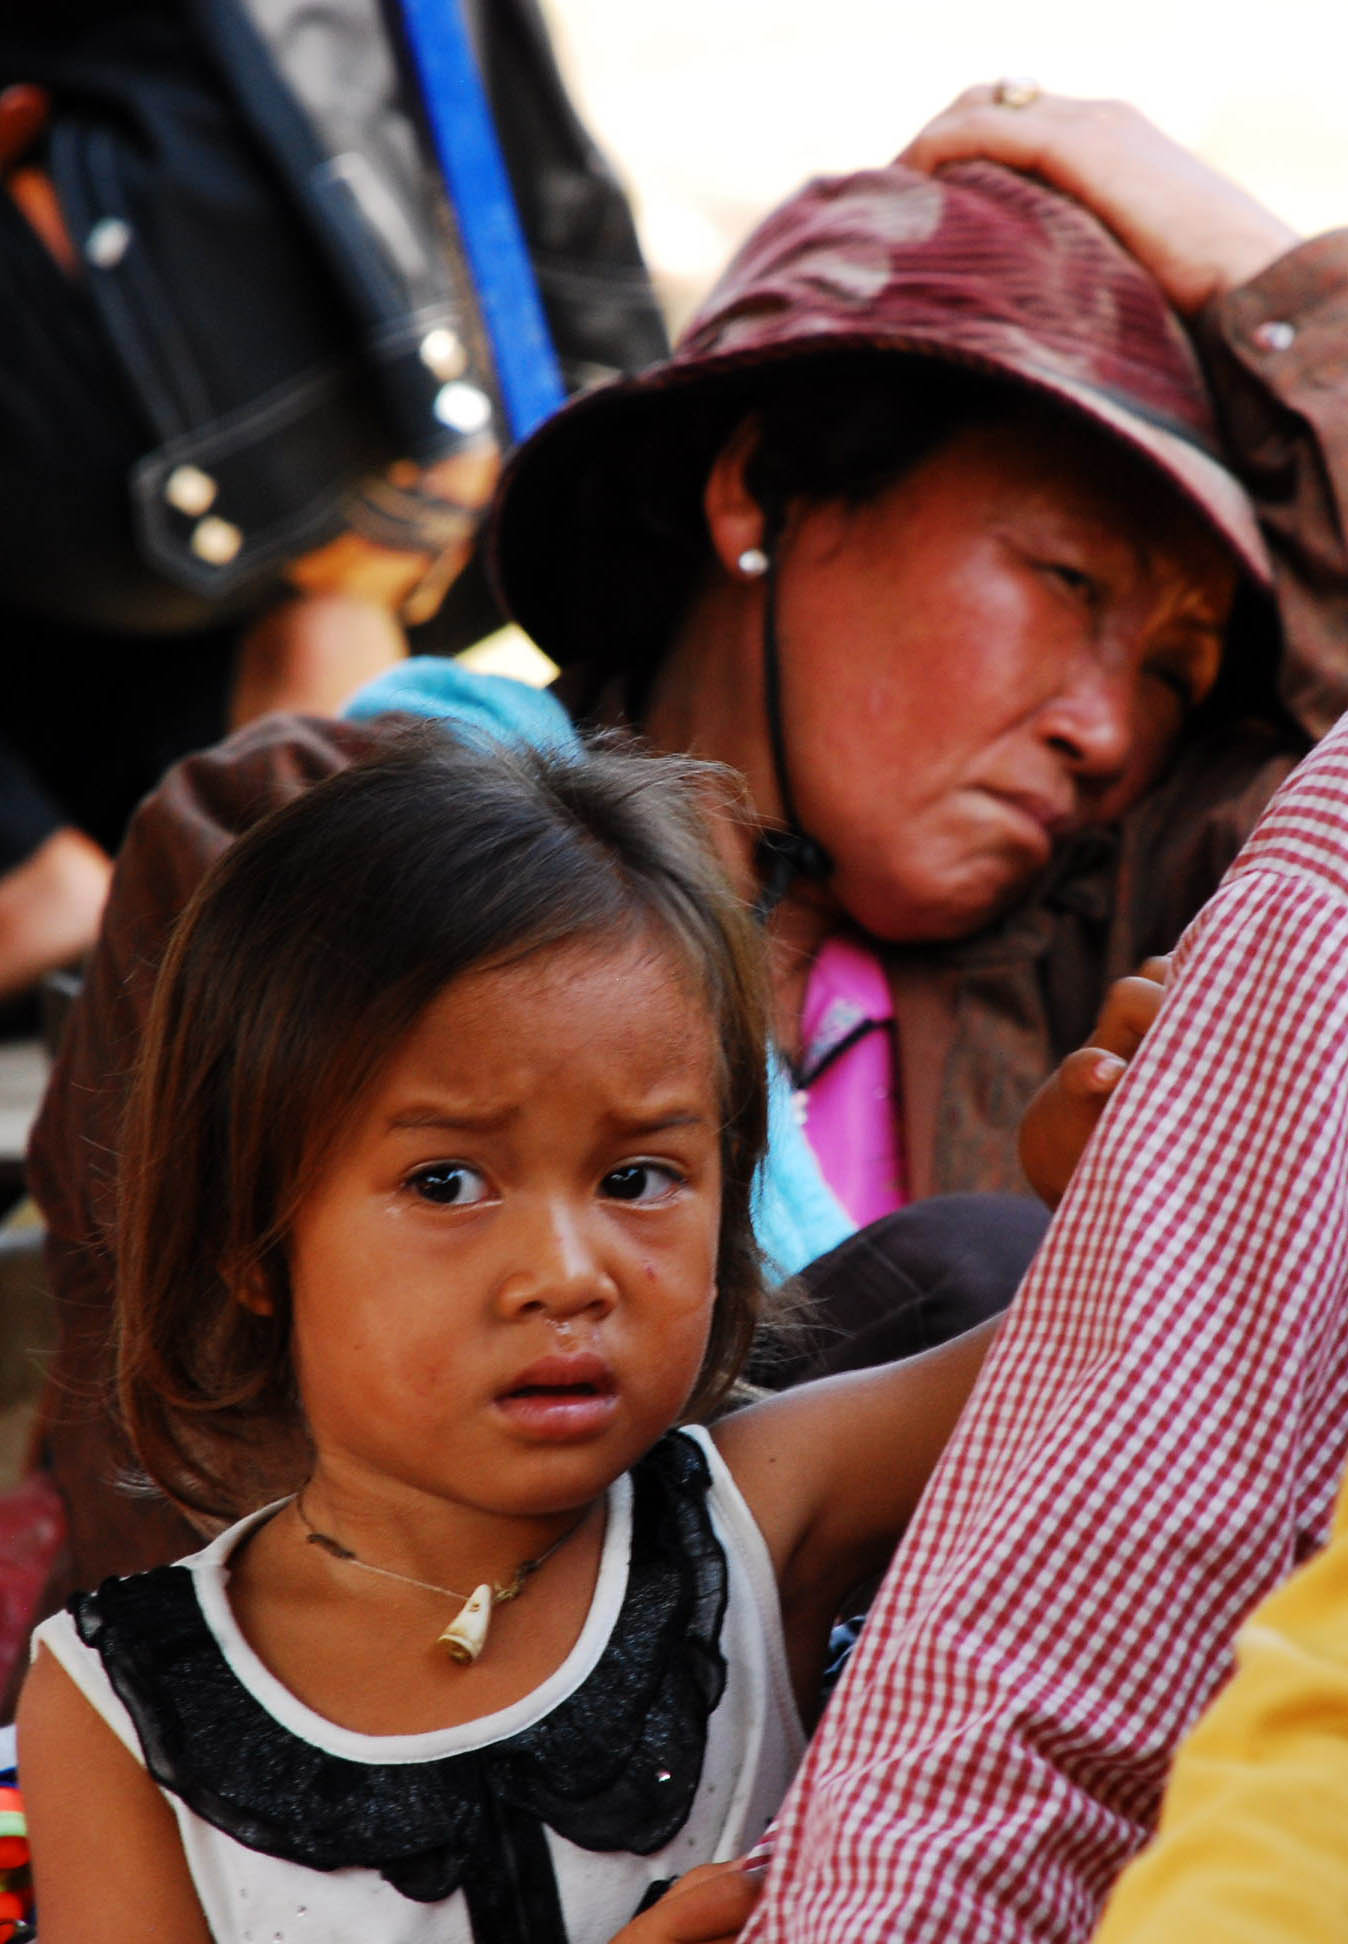
Travel Geek: Documentary Malaysia (Full HD)
Having spent 2013 filming in all parts of Malaysia, this documentary showcases six of the nine selected filming locations. Starting off in Malaysia’s cultural hub, I move northward from Malacca to celebrate Thaipusam outside of Kuala Lumpur. From there, I discover street foots, mile-high temples and Malaysia’s smallest and most diversified national park, roaming sand, sea and jungle in Penang. Then I take to the rafting waterways and climb active waterfalls in Gopeng. Following that is a trip through the tea-rich mountains of the Cameron Highlands where I find the world’s largest flower. And I end my journey on a tropical island getaway, snorkeling on Tioman Island.
[youtube=http://www.youtube.com/watch?v=EDN4xuVo51c&w=560&h=315]
Check out additional footage from Travel Geek: Documentary Malaysia
at: www.travelgeekmagazine.com
follow on twitter: @cyleodonnell & @travelgeekmag
Find on facebook: www.facebook.com/thetravelgeek
Like on facebook: www.facebook.com/cyleodonnellthetravelgeek
For collaborations and business inquiries, please contact via Channel Pages: http://ChannelPages.com/cyleodonnell
For the rest of the footage, as well as outtakes, extended cuts and extras that weren’t included in this film, check out the “Short Documentary Films” playlist, or select from the links below:
TGS: Documentary Malacca http://youtu.be/HGt9bMvJXeE
TGS: A History of Georgetown http://youtu.be/H4KI6T7gLLg
TGS: Hiking Tabur West http://youtu.be/KpK9tnRRAm4
TGS: Documentary Gopeng http://youtu.be/X2REKG-3w-8
TGS: DOcumentary Thaipusam (Extended Cut) http://youtu.be/PvpIWH5-gBo
TGS: Documentary Thaipusam http://youtu.be/el8V5UyY0Wk
TGS: Cameron Highlands http://youtu.be/7j1-bYKnrr0
TGS: Taman Negara http://youtu.be/T2raaBH8UPk
TGS: Hiking Tioman Island http://youtu.be/xpmola-7zWA
TGS: Snorkeling Tioman Island http://youtu.be/o5Hz5Qd0gKY
Serdang: Giant Hamster Ball Adventure http://youtu.be/mtEGWAMp26Q
Gourmet Chicken Tandoori Cuisine in Malacca http://youtu.be/_E3EJmsD3ek
Top Ten Photography Tips for Singapore
Okay, so this is wa- haa-hay more than ten tips. But I thought I would round it down and save some title space.
[youtube=http://www.youtube.com/watch?v=esXKhdIhjTU&w=560&h=315]
1. Depending on which time of the year, Singapore is a bright city. Take full advantage of the golden hours outside. But the rest of the day should probably be used for indoor photography. This won’t be a difficult decision, though, since midday hours are the hottest time of day.
Highlights:
2. You will probably get some great aerial photography taking the cable car over to Sentosa Island during the day. But at night, there are definitely some great photographic opportunities from inside the Singapore Flyer. Other good high points will include the Marina Bay Sands Hotel & Casino, the university library and any tall building that you can gain access to. These will be good for day or night shots.
3. Landscape shots can be achieved from just about anywhere in the city from rooftops. But the city also hires out helicopter rides over the entire area starting around $300/half-hour. Check with singaporeheliservices.com.sg/ for booking. And call well in advance.
4. As far as architectural shooting, I would choose a downtown location for evening shooting, depending on where you want the sun. Scouting the morning and night before you shoot will afford you a solid shooting schedule to fit into the very tight window of golden hour light. Remember, this place is pretty close to the equator, so those dramatic light shots are limited to less hours than, say, somewhere farther north or south in the mid-latitudes.
5. For street portraiture, stick to the heavily trafficked times. The rail system and bridges, as well as public buses, may be off limits due to heavy regulations on filming or stills. Check with other public works spaces for regulations on this as well. You will get your kookiest characters at night in and around the Geyland Red-light District and along Arab Street.
6. For nature photography, you can’t go wrong heading into any one of the many public gardens and parks throughout the city. These places are well kept, manicured daily and almost always free. And you’re sure to find some rare plants and insects abound.
Gear:
7. Singapore is a city in which you can run-and-gun to your heart’s desire. A tripod may as well be a ball-and-chain for much of what you’ll want to shoot here. The heat is also going to be a factor in how long you will want to stay outside. So unless you’re shooting time-lapse off a bridge (which may be illegal anyway), just go guerilla-style.
8. Fisheye and wide angle lenses work great downtown. It’s colorful enough in the evening that it might justify bringing the sticks out for a nice, panoramic shot. 30-50mm prime lenses will do great in capturing nice, fast action on the sidewalks for your street photography. But if you head up to the cable cars, helicopter rides or find a nice perch at your rooftop hostel lounge, don’t forget your 200+mm telephoto. There is enough action to justify bringing the extra weight.
9. As I mentioned before, there is no shortage of light during the dry season. This means you’ll probably want a set of Neutral Density filters. In the rainy season, a polarizer might work nicely for cleaning up those later evening high-humidity shots.
10. Weather can be a bit tricky from September to January as the rainy season throughout the region is in full effect during this time. So if your travel plans have you going there in these months, be sure to bring a zippered raincoat to quickly stow a camera as the rain comes on quite quickly. It might not be a bad idea to carry a large umbrella (though I can’t even count how many of these I have left leaning against a fence because I was so focused on shooting that I forgot about it). If you can find a way to attach it to a tripod or your backpack, that’s probably the best way to go. And of course, you’ll definitely want to have a cover for your gear bag. This should be with you anyway. But it’s worth a mention.
11. As for wind and dust, you should already have a dust rocket and fiber cloth. But if you don’t, add them to your pack. You’ll also want to be mindful of changing lenses in the wind here. There is all manner of microscopic wind-borne debris floating around Southeast Asia. And Singapore is no exception.
12. One note about this region that you may either love or hate (but will otherwise still want to know about) is that around August every year, there is a country-wide burning session that takes place in the rice fields of Sumatra. And because of the trade winds pushing west-to-east from Indonesia, the haze that it creates causes havoc all the way up to northern Malaysia.
You could either use this haze to add drama to your shooting style, or it could quite possibly be the bane of your shooting experience here. It all depends on how you prepare and what you’re trying to shoot. And in either case, you’ll also want to be mindful of your health as the experience of being here during that time is a lot like standing in front of a campfire for three straight weeks.
Safety:
13. Your gear will be safe here. Don’t leave it sitting around, of course, and you’ll leave home with everything that you haven’t personally lost or broken by yourself.
Clothing and the rest:
14. Singapore is non-stop. So whatever you bring, make sure that patience and stamina are right there with you. You’ll be sweating, too. So a handkerchief and loose, light clothing would also be helpful. You won’t have to climb anything that isn’t made of concrete, either. So a light, breathable pair of tennis shoes will do the trick over the heavier hiking boots that other Southeast Asian countries might require.
15. Singapore has some strange laws. Among them are No Spitting, No Swearing, No Drinking in Public, and, sadly, No Filming on Public Lands. What does this mean for you, the photographer? Well, it could mean many things. I personally have a home office in the U.S. and lawsuits across the pond normally die before they get started due to money, time and effort. But if you’re photographing a business with contacts in your home country, this could spell trouble. Model releases normally quash any question of future legal hassles. Keep them on hand. I’ve actually gotten to the point where I just have one copy on hand and have people sign a list indicating that they have read and understand the model, talent and property release that I can show them upon request.
Having said all this, it is strongly recommended that you do not publish any work that has not been released. If it can be construed as defamatory, fraudulent or otherwise piss someone off in general, you will be at the mercy of a court system you likely know nothing about. And you don’t want to end up in that situation. Get home before you publish your blogs. Singapore is not that big of a place. So you probably won’t be there that long anyway. And I wish I could say that I have never heard of anyone getting in trouble for what they publish in this part of the world, but I have indeed. And most of the time, this results in stiff fines and even imprisonment.
This goes for Malaysia as well. North of that all the way to China, you should be fine. But do not think that just because your blog only has a thousand followers, you won’t be picked up here. Play it safe and publish later.
That’s about it. If you have any questions or want to keep the conversation going, head over to travelgeekmagazine.com and comment on the post.
Thanks for listening and happy shooting!
Singapore 101: A Crash Course in Cheap Travel, Food, Lodging & More
The Republic of Singapore has Southeast Asia’s best economy. So if you visit at the end of your trip through the region, it may come as a shock to find out that it costs a bit more than its regional neighbors.
It’s also an island city-state off the southern tip of the Malay Peninsula, 137 kilometers north of the equator. So you may be finding yourself spending a little more time in restaurants and attractions to escape the heat. And these have a way of costing money.
[youtube=http://www.youtube.com/watch?v=TV77V_Kwfbk&w=560&h=315]
First off: Transportation.
Getting to Singapore by air is up to you and I can’t speak to costs there. But if you’re coming from Malaysia, there are two options (outside of renting your own car): the bus or the train.
I have taken both on my various trips. And I would recommend either. Both will cost anywhere from $10 to $25 depending on your level of chosen comforts. If I had to choose between the two, I’d go with the bus, however, because they are newer than the trains (which, in my opinion, sorely need overhauling).
I’ve never rented my own car, but I have heard that it is not an issue, coming from Malaysia. So for those of you who are brave (and wealthy) enough to afford this option, off to the forums with you!
While you’re in Singapore, transportation won’t be an issue. It’s a small place packed to the brim with fun stuff to do. For my top ten list of things to do in Singapore, see below or listen to the podcast here.
Hands-down, the cheapest way to get around Singapore is the public transportation system. The buses are safe and super cheap. And the same thing goes for the train. Both of these will get you to just about any place in the city for less than US$3 (one-way). But most hop-on, hop-off rides will cost less than US$1.
I won’t go into the mapping details. But you won’t have a problem asking locals which bus goes where. Everyone speaks English fluently throughout the city. And I was never given the wrong information. Also if they don’t know, they won’t send you in the wrong direction to save face, they will just tell you they don’t know. For rail transit system, just ask the on-duty safety officer, if an actual transportation agent is not at your stop.
Secondly: Lodging.
As in most places, the cost of lodging will swing widely based on your minimum expectations. I am a budget traveler, so I probably have the best advice for the shoestring visitor.
In a place like Singapore (and by that, I mean in a place where there are a lot of millionaires), the hotels even on the mid-range will likely match that of higher-priced hotels in other Southeast Asian countries. Remember, Singapore has Southeast Asia’s highest economy. So they hold themselves to a higher sense of class.
Now, this doesn’t mean that they are uptight (okay, some are — like the Singapore Art Museum, for instance). But it does mean that you’ll have to spend a little more of your budget on hotel and hostel stays.
The good news is that you will likely find yourself in much cleaner accommodations than in the other countries in this region. If you’re okay with low-to-mid-ranged budgets, you might want to shoot for Little India or Chinatown. These locations are known for their cheaper and livelier centers of attention. They are also surrounded by restaurants and attractions. So what you might lose in your lodging budget, you might make up for in saving taxi fares.
I was able to secure a three-night stay at the Shophouse Hostel on Arab Street (which represented the norm at the time I researched it), for US$12/night. This was not only the most competitive price; it was also the very good for the money. It was clean, the staff was super nice, and the owner even came out to help me film on my documentary at Sentosa Island.
Lastly: Food.
While traveling through Singapore, you’ll find that you have a lot of options in the food department. So it follows that you’ll have a wide price range as well. And depending on your level of courage, you may just end up saving money in this department.
All in, eating from food stalls all day will cost less than US$10. Restaurants will double that sum. But this includes non-alcoholic drinks and three meals a day.
Alcohol is very expensive once you go south of Thailand. Singapore is no exception. A pint will set you back as much as US$5 and forget about the club prices. Just buy a few cans and dance in the hostel’s upper lounge.
Much of the food in Singapore is fried. So if you’re a health nut or if your system isn’t that forgiving, you can add $10 per day to get away from the more easily and quickly cooked foods.
Some amazing delicacies and local favorites here include stingray soup and nasi lamuk (coconut milk rice) with chicken and veggies. The closer to the Geylang Red-light District you venture, the more adventurous the food gets (think cow tongue and pig penis).
Some important facts:
Dialing code: 65
Weather: 31°C, Wind SW at 11 km/h, 62% Humidity
Local time: UTC+8
Currency: Singapore Dollar
Official languages: English Language, Malay Language, Tamil, Standard Mandarin
Currency conversion:
100.00 USD = 125.511 SGD
US Dollar ↔ Singapore Dollar
1 USD = 1.25511 SGD 1 SGD = 0.796746 USD
Travel concerns:
Safety isn’t too big a concern here. Lock up your stuff in lockers, be attentive of your belongings and don’t go and do something stupid like hang your money out of your pocket and you should be fine.
Women: you will be stared at by Indian-Malays and Muslim men.
LGBT: Don’t announce too heavily in the conservative areas.
Top Ten Free or Cheap Things to do in Singapore
It’s been a long time coming, but I was inspired by a recent post on my YouTube channel that I should be offering some background advice for Singapore since my Singapore documentary film was released.
Time Magazine’s Daven Wu interviewed locals and dove into the scene, in Singapore to find out what to do in the city-state. Speaking with locals, you may be surprised at what they’re missing in their own backyard. But rest assured, there are plenty of things to do there. With only a couple of noted exceptions, this list is free, for all you budget travelers out there (transportation and food excluded).
1. If you’re an early riser, the Botanic Gardens open up at 5a.m. and are absolutely stunning. It’s more than just a breath of fresh air. And if you’re a jogger, it’s the perfect getaway from the hustle-n-bustle of the city. You’ll go through orchid gardens, see countless different species of butterflies, and groups of Tai Chi practitioners on your way around the loop. Get to the main entrance from Upper Palm Valley Road.
2. Ever heard of Hotel-hopping? No? Well, you can actually get into this in Singapore. If you go the Raffles Hotel, you’ll enter another world, back in time when this place fits more into the roaring 20s. You can half expect someone to walk buy with slicked hair and a zoot suit. Then there’s the Ritz-Carlton, which has one of the most spectacular collections of contemporary art. Their exhibits frequently boast works by Andy Warhol, David Hockney, Rainer Gross and Henry Moore just to name a few. There are more, but you get the picture. When hotels compete for attention, you win!
3. And if it’s art that you’re into, there are more museums than you can shake a stick at down Stamford Road. If this area is not already, it should definitely be known as the Museum district. It’s also in the vicinity of an old Dutch building-turned restaurant strip and a 12-story library frequented by students of the nearby university. And it’s all within a few city blocks. All of this is either free or they take donations for entry.
4. The Singapore zoo and Night Safari are not to be missed. Hit the zoo in the day time. And for an even cooler experience, visit the neighboring Night Safari Park for an otherworldly experience that you will thank yourself for seeing. The zoo covers 28 hectares and is open from 8:30 to 6pm (+65 6269 3411). Tickets run SD$22 for adults & $14 for kids. The Night Safari covers 40 hectares and is open 6:30 to midnight (+65 6269 3411). Tickets are SD$35 for adults $23 for kids. And while they’re not connected to each other in any official capacity, I do believe there is a discount if you buy zoo+safari tickets at the same time. You can see my footage from the Night Safari on my film, Travel Geek: Documentary Singapore.
5. The China Heritage Center (peranakanmuseum.sg), the Asian Civilization Museum (acm.org.sg) and the Singapore Philatelic Museum (www.spm.org.sg/) all charge a reasonable donation, but are worth the visit to get out of the heat and to learn something new about the history of Singaporean emigration and stamp collecting. The Star Wars nuts will love the stamp collection at the philatelic museum (ore about this in Documentary Singapore).
I should also include temples in number 5. Definitely seek out the temples. They are almost always free and you can spend several days checking them all out. There’s a Buddha’s tooth remnant said to be in the temple at South Bridge Road (found in Guthama’s ashes). And most other temples in the area have similar quirky claims to fame like that as well.
6. Avoid the shopping megastores which, if you’re anything like me, will make your head spin and cast you headlong into a relentlessly ebbing sea of commerce. To get your gear fix without the name brand barrage, head out to North Bridge Road to check out the Digitalife Mall where gear-heads and techies alike feel right at home. No purchase necessary. Another option would be Sim Lim Square on Rochor Canal Road.
7. Arab Street: Go there! It’s a little Indian quarter of the city that’s chalk-full of dining options, street bazaars and, most importantly, a nightly gathering of shisha-smoking locals. Relax in the cool, night air and order some local foods. But remember that this is a highly Muslim area. So heavy drinking (and the activity associated with it) is frowned-upon. Check out Documentary Singapore for my hostel review and dining experience at Cafe La Caire and the Shophouse Hostel across the street.
8. Probably the most expensive thing on the list, the Singapore Flyer, costs $30 Sing Dollars (US$24). But this has a hidden benefit. For starters, because its so high, it’s a lot like getting a semi-private helicopter ride over the best part of the city. And secondly, the fee is a deterrent for most people. So the lines are short and the cabins are less crowded. I rode the Flyer in my film. Check it out for details. There are also a ton of restaurants on the ground floor. Head downtown to Raffles Avenue to get there.
9. Though not free, visiting the top of the Marina Bay Sands Hotel & Casino will only set you back US$12. And while you’re up there, have a beer and enjoy the view of the Southeast Asia’s highest open-air swimming pool. This is where I did the introduction to my film from Singapore. To get into the infinity pool there, you may have to book a room. But you can probably stuff a fist-full of dollars into a hearty handshake with the security guards at the top floor and gain access the old fashioned way. To get there, just tell the cabbie you want to go the Skypark at the Marina Bay Sands. There’s a special entrance, so just save yourself the hassle and have them drop you off at the elevator.
10. The most amazing thing you’ll do in Singapore is to visit the Geylang Red Light district. When you hear people talking about the “dark side” of Singapore. This is the area they’re referring to. No rules. No one judging you. Just go there and decide your own level of involvement. The more you want, the more they want to give. But spend your time wisely. Many people go hard and fizzle out early. This is also the undisputed culinary leader in Singapore’s street food and cafes. You won’t be sorry. Head to Singapore’s east coast for the old world of architecture and simple pleasures.
Higher end?
To splurge on food and make it worth it: head to Dempsey Hill and find the White Rabbit Restaurant, which is a converted 1950s garrison barracks & church. Now, its full of art galleries, fine restaurants and spas. Wear your dinner jacket, though. They are not used to sweaty backpackers dumping their gear on the floor next to the tables.
To splurge on entertainment: Take the cable car over the Sentosa theme park and resort. But plan ahead wisely. This area is not cheap. But there’s more fun for adults to have than a night at the Playboy Mansion. There’s a Disney World area near the resort. But the Marine Park, tram stops, snake handling, plays and performances and about a gazillion other things go on here. Just visit the website, take your pick of things to do, and make a day of it. In my film on Singapore, you can see two of these events: The iFly indoor skydiving event and swimming with the sharks. Each costs around US $80 per visit, per person.
How Do I Do It?
People often ask me how it is that I find the time, money and energy to travel, write, take pictures and make films for such an extended period of time abroad. So I have created this journal to answer those questions.
Firstly, I am not rich. I have to work and budget my time and money just like most others. But I know a lot of people that travel in a wide range of fashions. And while their time and budgets vary greatly, they all have one thing in common: Energy. So I’ll start there.
When I was a little boy, I would listen to my father talk about his career as a photojournalist in the military. He would travel all over the world and photograph news and feature events for various newspapers and publications. I am sure that I would look at him with wild, unflinching eyes as my mind also traveled to these amazing, far off places in this world that I didn’t know.
It was also about that time that I got interested in photography. But not just photography. Video and stills were both very interesting to me. And because my father was also a budding wedding videographer at that time, I got some schooling in both. He would teach me the various items related to the lens (aesthetic, composition, white balance, ASA/ISO, exposure time/shutter speed, film speed, and on and on).
I ate it up. I started getting involved in photography competitions right in the third grade. I even won my very first competition – first place. It was a photo of a lone weed set amid the inverted backdrop of a reflected horizon in a pond. Even today I remember that being a pretty cool photo.
My brother and I would steal my dad’s cameras and make short films about old westerns and comedies. We would put on plays and act out parts. At the end of our films, we’d write the credits on a piece of paper and slowly drag them vertically in front of the camera because we didn’t have access to the equipment necessary for creating the credit-scrolling effect. We’d go to thrift stores and magic shops and spend our allowance on fake appendages, tinfoil coins and plastic cigars and we’d use them as props in our little productions.
Later, we would move to a small town in Kentucky where my brother and I would run the video equipment for our church to broadcast the sermon live on the air. Sometimes I’d be in the booth while my brother ran the cameras. And sometimes we’d switch.
As my teen years rolled on, my father’s wedding business grew and I’d find myself in his editing room, helping him on shoots and organizing lenses in the camera bag or just watching and learning the editing process from him.
I’d go on to join the military, myself. And I’d have my own business in the following years and have other interests as well. But all the while, I was always involved in some kind of visual medium – moving or still-life. Creative writing, too, was always on the back burner as I’d always be writing short stories of adventurous tales in the back of class.
The energy, therefore, to stay on task and create visual productions that document the goings on around me, was simply a non-issue. I would imagine it’s appropriate to describe photography and videography as one of my passions. The drive to explore was given to me as I’d salivate over my father’s stories. And therefore, documenting my travel experiences seems also to be a natural complement to that.
The second item, time, would probably be seen as an issue for most people. In fact, I don’t think I know anyone with such an abundance of time that they take to travel because they need to fill some hole in their life or risk dying of boredom. Time, I would imagine, is likely the biggest hurdle for us all.
However, the way that I find time to involve myself in travel and documentary productions is also closely related to how I find the funding as well. So the last two issues I’ll answer together.
My family was always moving around. We never really put down roots anywhere. The longest I spent in one place was my high school years. And even then it was the last two years (junior & senior years) that I spent in a different town than I started. So it would reasonably follow that I don’t really have much of an issue relocating. In fact, I am not sure that I even know how to settle because what I am comfortable with is seeing new surroundings about every couple years. I just always seem to need new stimuli.
My independent travel started when I joined the Navy. I went a few places while enlisted, but most of my travel was on my own, after I got out. I would move to Texas because I wanted to see what life was like in the south. Or I’d move to Kansas City to follow a promotion at work. Sometimes I’d even move to a new place because I needed bailing out. But whatever the case, I’d always find new surroundings quite frequently.
Finally, in 2003, I became interested in completing my lifelong interest in global exploration. I started busying myself with research into ways to study abroad in my college program or volunteer at a school or project somewhere. And eventually I found that there were a lot of options as long as I was willing to put in the legwork and dedicate myself to a certain amount of time and responsibility.
I had the passion and definitely would have made time. But there was always one thing lacking: money.
I knew what short term travel was like, and how I could use it to keep my wanderlust from taking over. So I had to start thinking creatively about how to sustain my passions for longer periods of time.
The first thing that I came up with was a bicycle trip. I assumed (quite accurately) that the three biggest hurdles to cheap travel were transportation, lodging and food. A long distance bicycling trip took care of all three. Transportation was only limited by my muscles (and the infrequent popped tire). Lodging was taken care of with my durable, three-season tent. And food generally amounted to pancake mix in the morning, spaghetti in the afternoon and one paid meal for dinner.
This regimen was great. And from 2005 to 2008 it carried me through 12 countries. While traveling by bike, I had plenty of time to stop and snap a photo, spend a few days writing and camping in one place or change direction at my own whim. And during this time, I used my spring, summer and winter breaks from school to go on these adventures. So there was plenty of time, plenty of energy and plenty of loan money to carry me through.
‘But what about when school ends,’ I thought. What happens when the funds stop, the time is more sparse and the effort must be managed between my other commitments?
After my biking trips abroad, I found myself living in Alaska working as an environmental scientist. It was fun. But it was very expensive. And leaving the country seemed more financially impossible than at any other time in my life. But my experience abroad, combined with some creativity would help me plan the goal that would make the next five years of long term travel a real possibility.
Having had so many breaks from college, I thought about how it would be nice to work in the academic setting and have all this time off to go and travel. I later combined this idea with my experience with traveling and working in new places (and of course, my interests in photography/videography) and POOF! There it was!
I was going to become an international educator, live abroad permanently and use my time off to see and document the towns and countries around my host country that interested me. And that’s just what I did.
I made my objectives early; I knew that I wanted to be a teacher. I thought about the hurdles; the things I needed to do to become qualified to teach in various settings. And I made a commitment to finances; budgeting for long term travel and all the gear and supplies that I would need.
And so I started my master’s degree in education and international communications. I packed up my “extras” and mailed them off to be kept in my dad’s basement. I cleared my schedule for the next few years. And I saved up every penny I could by the end of my contract working as a scientist and professor for the University of Alaska.
Since the end of 2009, I’ve been living and working abroad as an instructor in various forms. I have worked in middle schools, high schools, at after school clubs and even my current position as a college professor. I even worked freelance for newspapers and magazines as well as hosting live events and exhibitions to earn extra money from my photographs and videography expertise.
Most of the time, the teaching I did was for English or English as a Second Language (ESL). But the longer I have been involved, the more flexibility I have gained for instructing in my areas of interest. So I have also been able to start teaching in visual media (photography, graphic arts, videography, journalism, etc.). And in between those times, I have gone on to visit neighboring countries, exploring all the amazing places that I had longed to do so many years ago and creating the works that I’ve amassed since I started.
At this point in my life, though, I have it pretty much down to a science. The money that I would have spent at the pub on the weekend back home is now spent traveling and documenting during my breaks. I have more respect for my professional objectives because they allow me to explore the world and pursue my passions. The rewards that I thought were “rewarding” back home are some foreign lost cause that some corporate supervisor once tried to sell me. And all the achievements that I might have pushed for in my settled life have been replaced by the type of gratification that I imagined my dad got when he’d tell me about his amazing stories.
Now, I plan ahead like a master craftsman and execute like a poised artist. I have very little fear of failure because I know that I have the experience to accomplish what I set out to do. And the advice that I once asked of others is now being asked of me. And it’s not only humbling and rewarding, it also reminds me that I am doing well in life and that I have achieved real success.
So how do I do it now?
As far as traveling and documenting goes, I generally invite a teacher friend to come along and sometimes pay their way as we plan and execute a filming junket to a country of interest. It’s helps with safety, it offsets the cost of lodging and it makes a huge difference in being able to film in various conditions.
I research my travels by connecting with other travelers in the same locations or areas of interest, going onto travel forums and discussion boards, watching tutorials about where I’ll go, checking the currency indices and exchange patterns. I find out the topography and think back to times when I have traveled through similar climes and conditions to sort out what gear to bring. I think about all the electronic needs I have and consider if several of them can be taken care of with one device (e.g. alarm clock/maps/translations/exchange rate/calculator can all be found on an iPhone), and I budget both time and money without a shred of emotion (refraining from being partial to my love for this or that type of food, for instance). And many other things that have become a natural part of my planning process.
This last year has been the apex of all of my years of traveling and documenting. And I’ve even been able to start organizing all those scattered journals, books, photos and films that I’ve collected throughout the years into a well organized online medium. I’ve tried so many different things, that now I effortlessly get rid of what doesn’t work and focus on what does.
And at this point, I have several published books (and some that are yet to be released) of journals and research from my travels. I have the freedom to head off to a national park or an island paradise and bring the right video equipment with me because I’ve been able to refine all my gear to the best stuff that will work for the specific filming needs I’ll encounter. I’ll be sure to come back with great photos because of the technique that I have honed over the years of learning my lenses the hard way. And I now have more than 100 short and feature length videos, nearly 100,000 images and a countless number of stories to share of my experiences.
In retrospect, I am sure that the travelers of the future will be making quick business of my accomplishments and far surpass what I’ve been able to do. And I really can’t wait to see what the new generation of travelers will do, given the pioneering efforts of my generation – the first digital travelers.
I hope that this answered some questions as to how one might get out into the world. And I hope that it inspires interested travelers to do just that.
Remember, bills will always be there. So there’s never a better time to start putting money away for your goal of going global.
Here are my top ten points of advice for long term, live-abroad travel below:
- Make your plan and stick to it. Be as specific as possible in setting your goals.
- Find out where you want to go and how much it will cost to live there for at least one year. Include costs for children/spouse/pets. [If you’re considering a permanent move or a move which has you living in many different countries for many years, consider selling your things – which will help offset the startup costs.]
- Save up that amount of money and another $2000 for a return or open-ended flight. Plan to have money to buy a ticket home in the event of a family emergency.
- If you want to film, photograph or write, make sure you budget this equipment outside of your savings. On the flight, try to bring this equipment as a carry-on, rather than checked luggage.
- Plan your profession: What works well overseas vs. what you do well at home? Find that job niche and start connecting to employers abroad. Some hire six months to a year ahead of time.
- Plan your year: At least one full year is what is normally required by international contracts. So that means no pets, no rent, no car insurance, no cell phone bill. Nothing. The most you should be spending is in storage fees – buy for the year and set up options for longer.
- Tell your bank where (and for how long) you’ll be using your cards abroad.
- Travel light. Over-pack your wallet and under-pack your bags. Don’t worry, you’ll have plenty of time to accumulate an abundance of stuff overseas.
- Download Skype, set up a family email and Facebook account, create a community Drop Box account or create a blog through which others can easily contact you on a regular basis and keep up with where you are, what is happening and how to contact you in emergencies.
- Don’t go half-ass. The first two months of any long term transition are the hardest. Don’t be a pansy. Push through and make it work. You will be rewarded with a life changing year that you will never forget.
Travelcast #8 with Rae Mapey
Today’s travelcast finds the travel-savvy Rae Mapey talking about her latest gift to the nomadic world — her new mobile app!
Rae, a professed homegrown hockey fan straight out of B.C., found herself talking with friends about problems declaring taxable items at customs one night and, poof, the idea for Simply Declare was born.
Listen in as she discusses the many wonderful uses of her app and the extras that it has in tow.
[youtube=http://www.youtube.com/watch?v=zt-W2W_Ssjg&w=560&h=315]
Additional note: Since the recording, Rae has indeed chosen to take on advertising for her app in order to access newer markets, she said in a followup email. An in-app purchase of $.99 will remove the ads from this newer, free version of the app, she reported.
Do you have a unique gift to the travel world? Does your blog or expertise have to do with a nomadic lifestyle? Pitch me your idea and maybe we could do a travelcast together! Send inquiries to cyle@cyleodonnell.com.
Travelcast #5 Top Ten Travel Tips for Exercising on the Go
In addition to the video that I made in Borneo in mid-March, I have compiled a list of smart things to employ while traveling if you’ve got it in mind to continue your workout on the road.
Just because you’re traveling, it doesn’t mean that you have to give up on your exercise routine. The list below will help you keep on track with your workout long into your travels — whether you’re traveling for just a week or months on end.
Keep in mind that, while I mentioned keeping a schedule in this list, I wanted to make a special note about that here.
The attention and care that you take in planning your workout regimen before you leave will be your best tool in preparing you for keeping up with your workout. We all know how busy and chaotic travel can be. But if you’ve created a schedule of your workout before you left, there should be little that stays in the way of your exercising goals.
Think creatively: You can use your backpack as a dumbbell or a stack of books as a Yoga block. Look around for a hotel with a gym. Many towns and neighborhoods have a pool or small fitness center — ask around.
This schedule should ideally be in the form of a ledger or notebook with very specific times and activities. It should have a place for you to write down your progress and keep an accurate account of what you’ve done, when you’ve done it and how many or how long each exercise took to complete. Once you’ve checked it off, you know that you can take the necessary recovery time until your next workout date.
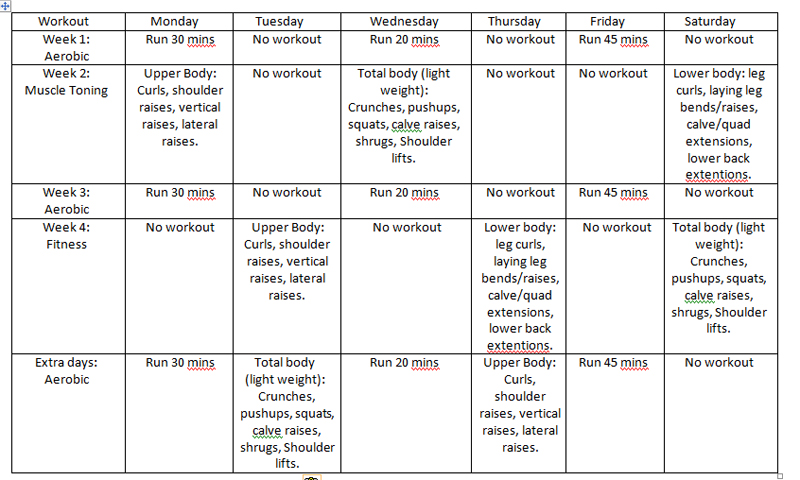 Above is a “general” schedule of workouts. It’s specific but not overwhelming. It’s organized, too — leaving ample time for muscle recovery between workouts. It also, you might notice, divides the workouts to challenge your body one week and aerobically work it the next.
I like this schedule because the muscle training weeks allow me to be “comfortably lazy.” This means that I can sit around in a hostel, lay poolside or hit the beach for an entire week but punctuate my workout with long periods of catching up on journals, editing photos or rendering the newest videos.
But this is specific to me, my travel schedule and my particular fitness goals. So you can shuffle this around a bit or use a lighter or heavier routine to suit your travel requirements.
This particular routine is good for those with “themed” travel, like photographing the scenes or writing blogs. But yours might be better suited having less muscle training.
The schedule below is for keeping track of progress and take notes like “too much beer last night” or “don’t like running on Mondays,” or things like that. It, again, is very basic and is based on the above regimen.

[About the video: I was in Borneo this past weekend filming for what will probably end up being three filming sessions to shoot what I want to shoot for the North Borneo Railroad, a jungle hike, some of Brunei and of course, the orangutan refuge (and maybe even do the Pada white water rafting). While there, I realized that Borneo is a great place to talk about the challenges of exercising on the go.]
[youtube=http://www.youtube.com/watch?v=SOUTjcuvBaU&w=560&h=315]
Below is the Top Ten list for how to stick to your routine while on the road.
The Top Ten List for Working Out on the Go:
1. Bring your own clothes and shoes — don’t plan on buying exercise gear or apparel in-country.
2. Pack any medical supplies that you need: inhalor, diabetic needs, etc.
3. In the cities, look for gyms that offer a free one- to three-day pass that can hold you over until you’re in the next city.
4. In the country, find a nice, out-of-the-way place to do your jogging. This will help to avoid animals, traffic and dangerous obstacles.
5. Bring a long-sleeved, synthetic fiber shirt for helping to avoid sunburn, dry skin from windy and arid conditions; and it will also provide a continual layer of moisture to help cool you off.
6. Bring a hat and sunglasses to keep the sun off your eyes and off of your face in the event that your workout takes longer than normal.
7. Don’t run in your hiking boots! And don’t hike in your exercise shoes. Take the time to pack safe enough shoes to support your workout.
8. Make a plan and stick to it. Just because you’re traveling, it doesn’t mean that you need to slide on your workout regimen.
9. Do sit-ups, push-ups and workout routines in your hotel room by bringing workout videos with you on your laptop.
10. Watch your diet. Extra attention must be paid when you change your diet to the host-country’s offerings. You can help this by bringing supplements and checking your beer/wine intake.
Do you find it hard to work out on the go? Tell me what you think in the comments section:
Travelcast #6 with Cristina Owen
Today’s podcast is with the lovely and loquacious Cristina Owen of www.chroniclesofatraveladdict.com. In this travelcast, we talk about everything from package tour ripoffs to her cat-sitting duties gone wrong. She also provides me with a very thought provoking and useful top ten list for budge travel. And what’s more, she even goes to eleven!
Check out her latest post on the podcast here.
So for everyone trying to save money on the go and wanting advice for solo female travelers, you’ve located your go-to gal.
When you’re finished watching, why not head over to her blog, subscribe to her updates and connect with her on twitter and Facebook (@TravelChronicle; facebook.com/thewritingchronicles)
[youtube=http://www.youtube.com/watch?v=WXyyMqd1WXc&w=560&h=315]
After this podcast, head over to her blog post and get her thoughts on the podcast and the followup to the Top Ten (plus one) list she gave me.
Insights from the Pavement: Being Mindful of Transitions
Just as we pass from one place to another along the way through our travels, we move through various states of awareness as well. Conversely, just because we step off a train in our new physical location, it doesn’t mean that we have a new understanding of this place. And somewhere in the middle of these two extremes lies the capacity to understand and be aware of these spheres of transition.

Knowing that there are inevitably going to be changes in life is simply not enough. Just as on the road, it helps to be aware when these changes are taking place. But it’s best to feel these changes, know their meaning and embrace the entry into that new circle of understanding.
Being both mindful and open to the idea of growing from our experiences will aid us in not only learning, but also in creating a pattern that embraces future opportunities to become better, more learned travelers in this exploration of life.
Seeing ourselves as vehicles for change, knowing when a learning situation is upon us, feeling that change within us and enacting the lesson that it has brought us are all intimate and profound personal experiences. And none of them happen the same way for any two people. Having had a taste for what real-world learning feels like, we will become more and more aware of these new experiences in the future. And welcoming them with open arms will become but an afterthought.
Like this photo from this journal? Check out the album HERE.
My new book, Insights from the Pavement, is a collection of 101 Travel Oms just like this one. Look for it to be released soon.
Join the conversation, tell me what you think about this idea. Leave your comments below.
Top Ten Things I Miss from Back Home while Traveling
It’s not often that I get to enjoy a nice, juicy steak. But when I do, I savor it.
Why is this? Because I have been living outside the U.S., home of the best porterhouse beef ribeyes this side of the moon, since 2009 and I have come to appreciate a good ol’ side of beef.
But a steak can still be bought in most places in the world. Being picky about how it is cooked or where it’s from is at least something that restaurants do for us in the expat community to try and emulate what it must be like in restaurants throughout the U.S. or other like-fashioned eateries.
But what about the stuff that you just can’t get abroad, or what about the conveniences that are thoughtlessly enjoyed back home?
Well, I’ve chosen this particular list for my very first Travel Geek Top Ten video blog!
I’ll be doing a lot more of these as I get more ideas for top ten videos. But for now, I thought I’d just put this video out and see if I could get the conversation started.
Watch below and let me know what your top ten would be, or tell me what would you add to my list.
[youtube=http://www.youtube.com/watch?v=_xIJI3_aItU&w=560&h=315]
One note about this video; I would also like to add two things to the list that I talk about in it:
- I miss being able to eat a meal with chicken in it (chicken salad, chicken soup, chicken parmesan, etc.) and not having to pick all the bones out while I’m eating. In Asia, they really don’t think it’s rude to prepare a meal and just leave the bones in – even in expensive restaurants. So just keep that in mind on your next date! [You look so lovely tonight…. Oh wait, sorry, I have to pick this giant wing bone out of my mouth and look like a fool and leave you with this as your first impression of me…]
- Stick deodorant… THAT WORKS. Buy it up before you travel kiddos. You won’t like what you find in third-world countries. It sticks to everything but the armpits, it smells worse than perspiration and it does absolutely nothing to thwart your body’s inclination to sweating.
Okay, that’s my list. What’s yours? Leave it in the comments section!